In this section, you will find all information about the gas module and its functionalities.
¶ Import gas monitoring data
Within the gas module, import of data is made from the tab “Import”. Imports are made from .csv files only with UTF-8 encoding. The platform can handle imports from standard files from several gas analyzers. If you need assistance for recovering data from your analyzer please contact your analyzer providers and have a look at the manual. However if you have an analyzer that is not listed on the platform please let us know and we will install it for you.
¶ Check your files
For smooth import, it is recommended to check your file before the importing process begins. We have prepared the import for raw files from the analyzers. Sometimes, if you have opened the file in Microsoft Excel or other software, the file has been reformatted. There are several important points that you should check in the files preferably using a text editor such NotePad or similar:
- Are the identification numbers or names of your sampling points the same that the ones setup in the platform ? Check in the module “Measurements” in the main Menu that all your names are the same. If not modify your file or your analyzer so there is a match. In the case there is not a match, the data will not be imported for that point and you will be informed during the process.
- Is the formatting of the date correct? Day or month first ? If not correct, use the edit function from your text editor or excel but save with UTF-8 encoding.
- Are the column names unchanged from the original files coming from the analyzer? If not, please change back to the original names.
- Do you use “ANSWER” columns? If so check with parameter(s) should be associated with that/these column(s) for later stage in this process.
¶ Import data
Now that you are sure that your file is correct we are going to proceed with the import. The import process has 3 steps:
- Preview: After selecting the file and some user inputs you will be able to check that everything looks like it should before going to the next step. If you find issues, go back to editing your file and restart the process until you have good results.
- Validation: During validation, each data entry is checked and you will be able to spot further issues.
- Import: Finally you can import your data into the platform.
¶ Preview
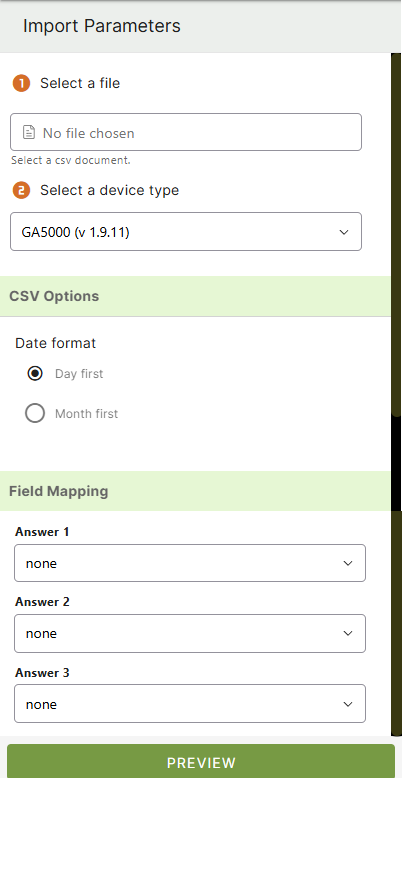 |
|
¶ Validation
The Validation step will inform you if some values are not correct or if a measurement point does not exist in the system. If the measurement point does not exist you can create one in the “Measurements” module in the main menu or choose to continue and the data will not be saved for that measurement point. You could later on create the measurement point and upload again the file. Only those measurements not imported the first time will be imported if you select the right option in the next step ("Import").
- click on VALIDATE
- Check the line status and if needed take action. Data lines will be categorized as VALID, INVALID or WARNING.

Click on IMPORT if you wish to continue with just the valid lines.
¶ Import
Now we are confident that our data are organized in the right form and that they can be imported into the system. Several options are possible:
Overwrite existing data: overwrite existing data that have the same timestamp and measurement id.
Ignore missing data: ignore data for non-existing measurement point (linked asset).
Click on the IMPORT button. You will be able to see the process ongoing.
- Imported: data are available on the platform database.
- Not imported: data are NOT available on the platform database.
- Overwritten: existing data have been overwritten and are now updated in the platform database.
- Skipped: import for that data line was skipped.
Straight after the import process is completed you will be able to see your data in the Gas module.